AI and machine learning · Free · ₹0
Edge AI and TinyML for Industrial Sensing
Put machine learning on the sensor: vibration, current and sound from motors, fans and pumps, sampled correctly, turned into spectral features, classified or scored for anomalies by a tiny model on an ESP32 or Arduino, quantised to fit, sent over MQTT or Modbus to a Node-RED dashboard, and deployed with a battery budget, updates and a drift check. Vision on a Raspberry Pi AI HAT and Jetson too. Hardware optional.

Inside the course


From the lessons

Edge or cloud for plant AI: latency, bandwidth, reliability and cost
Edge Impulse

Collecting sensor data: accelerometer, current clamp and microphone
Edge Impulse

Training a tiny neural network for LiteRT for Microcontrollers
Edge Impulse

Anomaly detection on a motor or fan with an ESP32
DigiKey
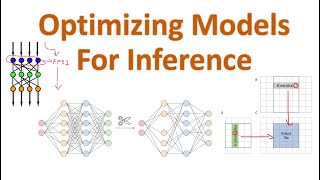
Quantisation, memory and latency budgets
Efficient NLP

Getting results out: MQTT, Modbus and Node-RED dashboards
ThinkIOT
Lesson frames belong to the creators named in the Credits below and are shown from YouTube.
What you will learn
Decide which plant AI belongs at the edge; choose a board from memory, compute and power figures; sample vibration, current and sound at the right rate; compute windows, FFTs and spectral features; train, evaluate and convert a tiny network for LiteRT for Microcontrollers; run Edge Impulse from data to deployment; build an anomaly detector with a threshold and debounce on an ESP32; classify machine sounds; quantise to int8 and build a memory and latency budget; run YOLO on a Raspberry Pi AI HAT or Jetson; publish results over MQTT and Modbus to Node-RED; and deploy with a battery budget, over-the-air updates and a drift check.
- Decide which plant AI belongs on the sensor node and which in the cloud, with the data rates worked out
- Choose between ESP32, Arduino Nano 33 BLE Sense, STM32, Raspberry Pi with an AI HAT and Jetson from memory, compute and power
- Set a sample rate from shaft and bearing frequencies, and read vibration, motor current and sound safely
- Turn signals into windows, FFTs and spectral features, and train a tiny network for LiteRT for Microcontrollers
- Build an anomaly detector on an ESP32 that learns normal, with a threshold and debounce set from data
- Classify machine sounds, quantise models to int8 and write a memory and latency budget
- Run YOLO on a Raspberry Pi AI HAT or Jetson, and publish results over MQTT and Modbus to Node-RED
- Deploy in the field with a battery budget, over-the-air updates with rollback and a monthly drift check
The course project · about 18 hours
An ESP32 vibration node that learns normal on a fan, flags anomalies and reports to MQTT and a Node-RED dashboard
Build a vibration anomaly node: sample a fan or motor at a rate you justify from its frequencies, compute spectral features, train an anomaly model on normal data only, set a threshold and a debounce from held-out normal data, deploy it to an ESP32, publish the score over MQTT to a Node-RED dashboard, test it with induced faults and a 24-hour false alarm run, and write the deployment sheet. A phone, Wokwi and a public dataset replace the hardware if you have none.
Sample document pack, 5 documents, filled in for the scenario
- URSRequirements for the fan vibration anomaly node
- SDSDesign note for the fan F-07 anomaly node
- Test reportAcceptance test of the fan F-07 anomaly node
- ProcedureCommissioning, update and monthly drift check for the fan anomaly nodes
- Risk registerRisk register for the fan anomaly nodes
Read inside the course and download as a workbook. The project is optional practice, marked when you submit it; the certificate needs only the modules and the final assessment.
Course content
13 modules · 42 lessons · 10h 18m
In order, at whatever pace suits you. Each module ends with a practice task that builds on the last.
- 01Edge or cloud for plant AI: latency, bandwidth, reliability and cost3 lessons32m
- 02The hardware map: microcontrollers, Raspberry Pi with an AI HAT, and Jetson3 lessons34m
- 03Collecting sensor data: accelerometer, current clamp and microphone4 lessons50m
- 04Features for signals: windows, FFT and spectral features3 lessons46m
- 05Training a tiny neural network for LiteRT for Microcontrollers4 lessons47m
- 06Edge Impulse end to end: data, impulse, test and deploy4 lessons52m
- 07Anomaly detection on a motor or fan with an ESP323 lessons1h 12m
- 08Sound classification for machine states4 lessons42m
Requirements
- Who it is for
- Intermediate. For instrumentation, maintenance, IIoT and embedded engineers, and final-year electrical, electronics and instrumentation students. You should be able to read a datasheet and edit a short Arduino or Python program. Machine Learning with Python or Predictive Maintenance with Machine Learning is a useful course before this one, but not required.
- Software
- Edge Impulse (free Developer plan, in the browser), Arduino IDE 2, Google Colab with TensorFlow and LiteRT, Ultralytics YOLO, Mosquitto, Node-RED and the Wokwi simulator. All have a free route. What to download, and how
- Hardware
- Optional. Every module can be done with a smartphone as the sensor, the Wokwi simulator and public datasets. To build the real node: an ESP32 or Arduino Nano 33 BLE Sense with an ADXL345 or MPU6050 accelerometer and a small fan; a Raspberry Pi 5 with an AI HAT or a Jetson Orin Nano is optional for the vision module.
Software you need
What to download, where from, what it costs and how to install it. Every link goes to the maker's own site, never a mirror.
No hardware is needed: Edge Impulse takes data from a phone, and the Wokwi simulator at wokwi.com runs an ESP32 with MQTT in the browser. Add the ESP32 boards package in the Arduino IDE Boards Manager to build a real node. Ultralytics YOLO is only for the vision module.
Required
- 01Free Developer plan, 3 private projects
Edge Impulse Studio
Edge Impulse (a Qualcomm company), in the browser
- Runs on
- Any modern web browser; the optional command-line tools need Node.js on Windows, macOS or Linux
- Account
- A free Edge Impulse account
The Developer plan is free for individual developers, students and universities: 3 private projects and unlimited public ones, 60 minutes of compute per job, GPU training and up to 3 collaborators per project. It covers learning, internal R&D and pre-production; production use needs the paid Enterprise plan. Terms change, so read the current pricing page.
Steps
- 1.Open edgeimpulse.com and sign up for a free account.
- 2.Create a new project and choose the kind of data (accelerometer, audio or images).
- 3.Collect data from your phone by scanning the QR code under Data acquisition, or upload files, or connect a board with the data forwarder.
- 4.Design the impulse, train, test, then open Deployment and export an Arduino or C++ library.
- Do not upload data your employer has not cleared for an external service; public datasets work for every module.
- The command-line tools (npm install -g edge-impulse-cli) are needed only for the data forwarder from a board.
Open Edge Impulse Studioedgeimpulse.com - 02Free
Arduino IDE 2
Arduino
- Runs on
- Windows 10 or later, macOS, Linux (AppImage and ZIP)
- Account
- None needed
Free, open source; the source code is published on GitHub.
Steps
- 1.Open arduino.cc/en/software and download Arduino IDE 2 for your operating system.
- 2.Install it and start it.
- 3.For an ESP32, open File, Preferences, and add the Espressif boards URL given in Espressif's arduino-esp32 documentation; then install esp32 in Boards Manager.
- 4.Connect the board by USB, choose it under Tools, Board and Port, and upload the Blink example to check the set-up.
- 5.To run an Edge Impulse model, use Sketch, Include Library, Add .ZIP Library with the library exported from Edge Impulse.
- If the port does not appear on Windows, install the USB to serial driver for your board's chip (CP210x or CH340).
- The legacy IDE 1.8.19 is still offered for old computers, but the course uses IDE 2.
Official download pagearduino.cc
Optional
Useful, not needed to finish the course.
- 03Free, GPU time not guaranteed
Google Colab
Google, in the browser
- Runs on
- Any modern web browser
- Account
- A free Google account
Colab is free to use. In the free version GPUs and TPUs are heavily restricted and not guaranteed, sessions can run for at most 12 hours, and idle sessions are stopped. Paid plans give more reliable access.
Steps
- 1.Open colab.research.google.com and sign in with your Google account.
- 2.Click New notebook (or open the notebook your course links to).
- 3.For a GPU, choose Runtime, then Change runtime type, then pick a GPU if one is offered.
- 4.Type code in a cell and press Shift and Enter to run it.
- Save a copy to your Google Drive so your changes are kept.
- Files on the runtime are deleted when the session ends. Save outputs to Drive.
Open Google Colabcolab.research.google.com - 04Free
TensorFlow
Google (TensorFlow project), a Python or npm package
- Runs on
- Python 3.10 to 3.13. Ubuntu 16.04 or later; macOS 12 or later (CPU only); Windows 7 or later (CPU only); Windows 10 build 19044 or later through WSL2 for GPU.
- Account
- None needed
Free, open source under the Apache 2.0 licence.
Steps
- 1.Install a supported Python (3.10 to 3.13) and create a virtual environment.
- 2.Upgrade pip: pip install --upgrade pip
- 3.For CPU: pip install tensorflow
- 4.For an NVIDIA GPU on Linux or WSL2: pip install tensorflow[and-cuda]
- 5.Test it: python -c "import tensorflow as tf; print(tf.config.list_physical_devices('GPU'))"
- TensorFlow 2.10 was the last release with GPU support on native Windows. For a GPU on Windows, install inside WSL2.
- If you have no GPU, use Google Colab to train larger models.
Official download pagetensorflow.org - 05Free
Eclipse Mosquitto
Eclipse Foundation
- Runs on
- Windows (64-bit and 32-bit installers), macOS (Homebrew), Linux (Ubuntu PPA, Debian, Raspberry Pi, Snap)
- Account
- None needed
Free, open source under the Eclipse Public License and Eclipse Distribution License.
Steps
- 1.Open mosquitto.org/download.
- 2.On Windows, download the 64-bit installer and run it. On macOS run: brew install mosquitto. On Ubuntu run: sudo apt-add-repository ppa:mosquitto-dev/mosquitto-ppa, then sudo apt-get update and sudo apt-get install mosquitto mosquitto-clients.
- 3.Start the broker by running: mosquitto -v
- 4.In a second terminal, subscribe with: mosquitto_sub -t test, and in a third publish with: mosquitto_pub -t test -m hello
- By default Mosquitto 2 only accepts connections from the same computer. To allow other devices, add a listener and authentication settings to mosquitto.conf.
- Use a lab network only. Do not expose an open broker to the internet.
Official download pagemosquitto.org - 06Free
Node-RED
OpenJS Foundation (Node-RED project)
- Runs on
- Windows, macOS and Linux (needs Node.js 22 or later; Node.js 24 recommended), or Docker
- Account
- None needed
Free, open source under the Apache 2.0 licence.
Steps
- 1.Install Node.js LTS from nodejs.org.
- 2.On Windows run: npm install -g node-red (on macOS or Linux run: sudo npm install -g node-red).
- 3.Start it by running: node-red
- 4.Open http://localhost:1880 in your browser to use the editor.
- With Docker, run: docker run -it -p 1880:1880 --name mynodered nodered/node-red
- Leave the terminal window open while you use Node-RED.
Official download pagenodered.org - 07Free
Ultralytics YOLO
Ultralytics, a Python or npm package
- Runs on
- Windows, macOS and Linux with Python 3.8 or later and PyTorch 1.8 or later
- Account
- None needed
Free under AGPL-3.0 for learning, research and open source projects, but any project using it must also be open source under AGPL-3.0. Commercial or closed-source use, including internal company tools, needs a paid Ultralytics Enterprise licence.
Steps
- 1.Install Python and, if you have an NVIDIA GPU, install PyTorch first from pytorch.org for your CUDA version.
- 2.Run: pip install -U ultralytics
- 3.Test it: yolo predict model=yolo26n.pt
- 4.Find the results in runs/detect/predict.
- The first run downloads the model weights, so you need internet access.
- If you plan to use YOLO at work, read the licence page before you start.
Official download pagedocs.ultralytics.com
Checked against each maker's own page on 27 September 2026. Trial lengths and editions change; the maker's page is the final word.
Edge AI and TinyML for Industrial Sensing at a glance
Edge AI and TinyML for Industrial Sensing is a free, self-paced online course from EDWartens for instrumentation, maintenance, IIoT and embedded engineers, and final-year electrical, electronics and instrumentation students in India, the Gulf and worldwide who want machine learning on the sensor node. It has 13 modules and 10h 18m of video lessons by Edge Impulse, DigiKey, IBM Technology and others, with written notes and worked problems, a practical project with a document pack and a 15-question final assessment (pass mark 60%). Learning is free with an account; an optional certificate with a public verification code is issued when you pass. Last updated 27 September 2026.
All course factsHide course facts
- Price
- ₹0, free for good. No trial, no card. Comparable classroom training of this length costs about ₹5,999.
- Who it is for
- Instrumentation, maintenance, IIoT and embedded engineers, and final-year electrical, electronics and instrumentation students in India, the Gulf and worldwide who want machine learning on the sensor node
- Format
- 13 self-paced modules, 10h 18m of video, written notes, a practice task per module and one final assessment.
- Level
- Intermediate. Intermediate. For instrumentation, maintenance, IIoT and embedded engineers, and final-year electrical, electronics and instrumentation students. You should be able to read a datasheet and edit a short Arduino or Python program. Machine Learning with Python or Predictive Maintenance with Machine Learning is a useful course before this one, but not required.
- Brand
- Vendor-neutral
- Software
- Edge Impulse (free Developer plan, in the browser), Arduino IDE 2, Google Colab with TensorFlow and LiteRT, Ultralytics YOLO, Mosquitto, Node-RED and the Wokwi simulator. All have a free route.
- Hardware
- Optional. Every module can be done with a smartphone as the sensor, the Wokwi simulator and public datasets. To build the real node: an ESP32 or Arduino Nano 33 BLE Sense with an ADXL345 or MPU6050 accelerometer and a small fan; a Raspberry Pi 5 with an AI HAT or a Jetson Orin Nano is optional for the vision module.
- Certificate
- Optional EDWartens Certificate of Completion, verifiable by code. Not a vendor credential.
- Video lessons by
- Edge Impulse, DigiKey, IBM Technology, EDGE AI FOUNDATION, Andreas Spiess, Hardware.ai, Core Electronics, Edje Electronics, Jeff Geerling, Joyce Lin, Efficient NLP, Circuit Digest, ThinkIOT, Learn Embedded Systems, educ8s.tv, Evidently AI (independent creators, credited below)
- Language
- English
- Last updated
- 27 September 2026
A shareable EDWartens certificate
Finish every module and pass the final assessment, and the optional EDWartens certificate is yours. It carries a unique verification code on a public page anyone can check, so it stands up when a recruiter looks it up. See it below.
The course itself stays free whether or not you ever buy one.
Stuck? Ask a practising engineer
A free course usually means a comment section and hope. This one does not. Every module has an Ask-your-trainer panel that reaches the same engineers who teach our paid programme: people who commission panels for a living, not moderators.
Pairs well with
 PLC programming · FreeSiemens TIA PortalFrom zero electrical knowledge to a working, simulated S7-1200 program, for nothing.
 PLC programming · FreeSiemens TIA Portal in Three HoursThe first three hours of the Siemens TIA Portal course, cut to end on a win: what a PLC is, how it is wired, a project configured in TIA Portal, and your first ladder program running in simulation. Finish it in an evening or two, earn a certificate, and carry straight on into the full course.
 PLC programming · FreeTIA Portal: Build a MachineOne machine, start to finish. Take a bottle filling line from a written specification and an I/O list to a structured S7-1200 program with a fill station, a capper, a reject sorter and an operator screen with alarms, then test it against a written record and archive it for hand-over. The lessons are the reference; the machine is yours, and it is what you submit.
 Instrumentation · FreeInstrumentation for PLC EngineersThe half of the loop that is not code. Follow one measurement from the transmitter in the field, down the 4-20 mA loop, into the analog card, through NORM_X and SCALE_X into engineering units, out again to a valve, and back to the control room when the reading is wrong.
More free courses: Free AI courses for engineers
Learner reviews
No reviews yet
Reviews here are written only by learners who have finished every module of Edge AI and TinyML for Industrial Sensing, and they are published exactly as written. Finish the course and yours will be the first.
Common questions
Who is this edge AI and TinyML course for?
It is for instrumentation, maintenance, IIoT and embedded engineers who want machine learning on the sensor itself, and for final-year electrical, electronics and instrumentation students in India, the Gulf and elsewhere. It suits anyone who looks after motors, fans and pumps and wants early warning of faults without streaming raw data to the cloud.
Do I need to buy hardware?
No. Every module can be done with a smartphone as the sensor in Edge Impulse, the Wokwi ESP32 simulator in the browser, and public datasets such as the CWRU bearing data and the MIMII machine sounds. If you want to build the real node, an ESP32 board with an ADXL345 accelerometer and a small desk fan is enough; a Raspberry Pi 5 with an AI HAT or a Jetson is optional for the vision module.
Is the course free to learn?
Yes. Every module, the notes, the worked problems, the project and the final assessment are free, and every tool used has a free route: the Edge Impulse Developer plan, Arduino IDE, Google Colab, Node-RED, Mosquitto and Wokwi. The certificate is optional.
What do I need to know first?
You should be able to read a datasheet and edit a short Arduino or Python program. Machine learning is taught from the level a tiny model needs; Machine Learning with Python or Predictive Maintenance with Machine Learning are good courses before or after this one, and Node-RED for Industrial IoT goes deeper into MQTT and dashboards.
Is Edge Impulse still free now that it is part of Qualcomm?
Yes, for learning. Edge Impulse joined Qualcomm (announced March 2025) and still supports boards from other makers. Its free Developer plan gave 3 private projects, 60 minutes of compute per job and GPU training when checked in October 2026, for learning, internal R&D and pre-production; a product shipped to customers needs the paid Enterprise plan. Read the current terms before building anything for production.
Can an edge AI node trip or stop a machine?
No. The course treats every edge AI output as an advisory alarm for people, work orders and history. Trips and safety functions need certified sensors and logic designed to standards such as IEC 61511 or IEC 62061, which are covered in Safety Instrumented Systems and SIL to IEC 61511.
How long does the Edge AI and TinyML for Industrial Sensing course take?
About 18 hours of video, notes and practice at your own pace, of which about 10 hours is video. The optional vibration node project takes about 18 hours more.
What certificate does the Edge AI and TinyML for Industrial Sensing course give?
An EDWartens certificate of completion, issued when you finish the modules and pass the 15-question final at 60 percent, with a number anyone can verify on our site. It is not a certification from Edge Impulse, Qualcomm, Arduino, Espressif, Raspberry Pi or NVIDIA, none of whom is affiliated with EDWartens.
Is the Edge AI and TinyML for Industrial Sensing course free in India, and what does the certificate cost?
Yes. Learning costs ₹0 in India: every module, the written notes, the practice tasks and the final assessment, with no card and no trial period. The only paid item is the optional EDWartens Certificate of Completion, ₹559 including GST for this intermediate course, paid in rupees through Razorpay, and only if you want it after passing the final assessment.
What you walk away with
Your certificate for Edge AI and TinyML for Industrial Sensing
Finish the course, pass the final, and this is the document with your name on it.

Verifiable by anyone
Adds to LinkedIn in one click
QR code on the certificate
Names what you can do
A permanent link
Earned, not attended
Learning is free. The certificate is optional.
Add it now and pay only when you have finished the course, or come back for it later. One-off, US$28.99, with a receipt.
Issued by EDWartens India (Wartens Automation Private Limited) as a Certificate of Completion for this self-paced course. It is not a vendor certification, a university award or a CPD-accredited activity, and it does not certify competence on live equipment. Delivered electronically; see the refund policy.
Credits
Who made the video lessons
The video lessons in this course were created by the people below, not by EDWartens. Every lesson streams from its creator's own YouTube channel; EDWartens neither hosts nor sells that footage, and the creators are not affiliated with EDWartens and do not endorse this course. What EDWartens wrote is the study plan, the notes, the practice tasks and the assessments.
- Edge ImpulseShawn Hymel's Introduction to Embedded Machine Learning lessons on embedded and ML hardware, data collection, motion features, neural networks, evaluation, deployment to Arduino, audio classification and keyword spotting, plus What is Edge AI, connecting the ESP32, the C++ library and advanced anomaly detection
- DigiKeyIntro to TinyML Parts 1 and 2, the Edge AI Anomaly Detection series on data collection, features and deploying to an ESP32, wake word feature extraction, feature selection, STM32 X-CUBE-AI, and the Let's Talk Technical edge AI panel used as the final recap
- IBM Technologythe explainer on edge AI against distributed AI
- EDGE AI FOUNDATIONthe tinyML Talks practical guide to neural network quantisation and the talk on managing tiny machine learning at industrial scale
- Andreas Spiessthe test of seven current sensors for microcontrollers and the ESP32 over-the-air update tutorial
- Hardware.aipredictive maintenance with Arduino and Edge Impulse
- Core ElectronicsYOLO object detection on the Raspberry Pi AI HAT with Python
- Edje Electronicsrunning YOLO26 detection models on the NVIDIA Jetson Orin Nano
- Jeff Geerlingthe review of the Raspberry Pi AI HAT
- Joyce Linthe edge AI comparison of Raspberry Pi, Hailo-8 and Jetson Orin Nano
- Efficient NLPquantisation, pruning and distillation compared
- Circuit Digestobject detection on the ESP32-CAM with an Edge Impulse model
- ThinkIOTthe Wokwi ESP32 simulator with MQTT and a Node-RED dashboard
- Learn Embedded Systemsan ESP32 MQTT sensor node and a Raspberry Pi IoT server with InfluxDB, MQTT, Grafana, Node-RED and Docker
- educ8s.tvthe ESP32 deep sleep tutorial for low-power nodes
- Evidently AIthe explainer on data drift in machine learning monitoring
If you are one of these creators and would like a lesson removed or credited differently, write to info@wartens.com.